Kubernetes — getting started
Last updated: May 27, 2026
Kubernetes (often abbreviated as K8s) is an open-source container orchestration platform for automating the deployment, scaling, and management of containerized applications. American Cloud Kubernetes Service (ACKS) is American Cloud's fully-managed Kubernetes offering — you create a cluster, the platform provisions control and worker nodes for you, and you interact with it through kubectl.
This article walks through installing kubectl, creating an ACKS cluster, downloading its kubeconfig, and scaling or upgrading the cluster from the portal.
Install kubectl
macOS
brew install kubernetes-cliLinux
curl -LO "https://dl.k8s.io/release/$(curl -L -s https://dl.k8s.io/release/stable.txt)/bin/linux/amd64/kubectl"
chmod +x ./kubectl
sudo mv ./kubectl /usr/local/bin/kubectl
Windows
See the official kubectl install guide.
Create an ACKS cluster
- In the left navigation, under Compute, select Kubernetes.
- In the top right of the Kubernetes page, click + Create Cluster.

- On the Create Kubernetes cluster page, fill in the Configuration section:
- Cluster name — lowercase letters, numbers, and hyphens (for example,
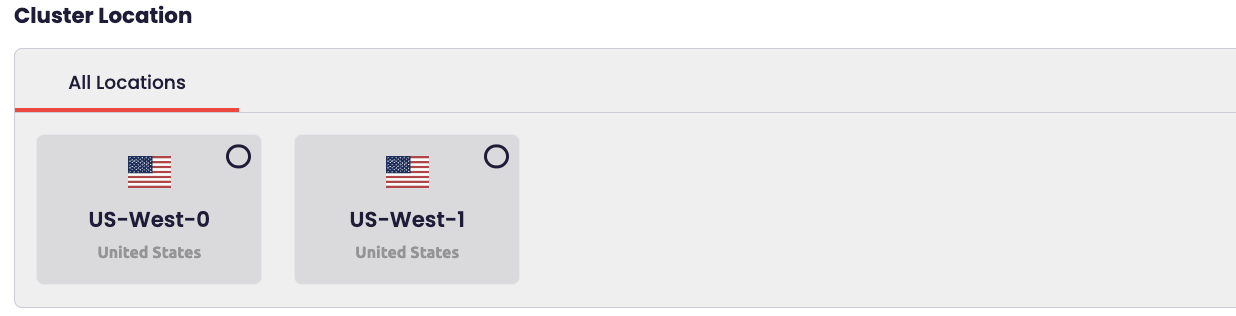
my-app-k8). - Region — for example, US Central.
- Package — sets the size and pricing tier of each node (for example, Scale ACKS — 4 vCPU, 8 GB memory).
- Kubernetes version — the version to install (for example,
1.33.1). - Network (optional) — an existing VPC tier. Leave blank and CloudStack creates an isolated network automatically.
- Cluster name — lowercase letters, numbers, and hyphens (for example,

-
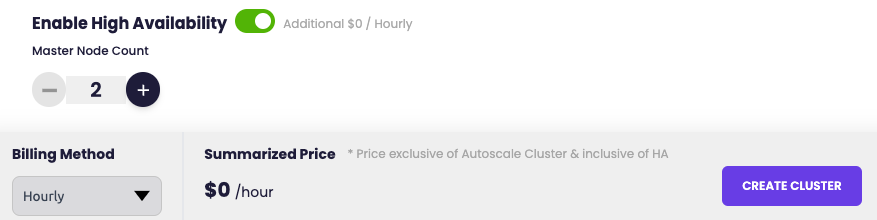
Configure the Node Pool:
- Control nodes — 1–11. Three or more control nodes provide HA via an etcd quorum that tolerates a one-node failure.
- Worker nodes — 1–32.
-
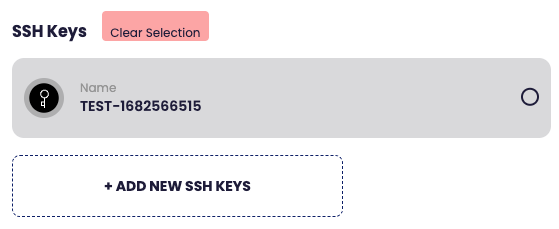
In Options:
- SSH keypair — recommended; allows SSH access to cluster nodes. Add a key first under Account → SSH keys if you don't have one (see Managing SSH keys).
- Description — optional.
-
Review the estimated cost at the bottom and click Create Cluster.

The cluster appears in the Clusters list with status CREATING. Provisioning takes a few minutes.

Once status is RUNNING, the row populates with version, region, package, node counts, and per-node specs.
Cluster detail page
Click a cluster in the list to open its detail page. The page summarizes the cluster and exposes four action buttons in the top right.

Sections on the page:
- Node Pool — control node count, worker node count, total CPU, total memory.
- Configuration — region, IP address, Kubernetes version, package, autoscaling state, total nodes, creation time, description.
- Nodes — each node's name, role (control/worker), state, IP, CPU, memory, and root disk.
- Load Balancer Rules — the rules attached to the cluster's public IP (the Kubernetes API server rule, plus any rules you've added). See Load balancer.
Actions
- Kubeconfig — download the cluster's kubeconfig file.
- Power — start or stop the cluster.
- Manage — scale, autoscale, or upgrade (see below).
- Delete — permanently remove the cluster and its nodes.
Download and use the kubeconfig
- On the cluster detail page, click Kubeconfig to download the file (typically to your
~/Downloadsfolder). - Point
kubectlat it:
export KUBECONFIG=~/Downloads/kube.conf- Verify the connection:
kubectl get nodesYou should see the control and worker nodes listed.
Scale, autoscale, and upgrade
Open the cluster's detail page and click Manage in the top right. Three options appear.
Scale workers
Change the worker node count manually.
- Click Manage → Scale Workers.
- In the Scale Worker Nodes dialog, set the new worker count (1–20) on the slider.
- Click Apply.
Autoscale
Click Manage → Autoscale to enable automatic worker scaling based on cluster load. See Autoscaling for details.
Upgrade
Click Manage → Upgrade to upgrade the cluster to a newer Kubernetes version. If you're already on the latest available version, the dialog says so.
